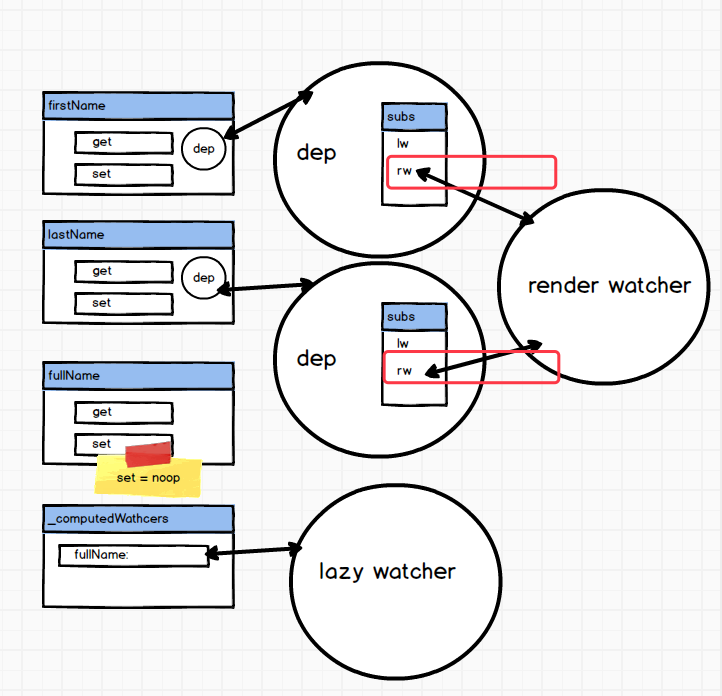
深入浅出 Vue computed

由深入浅出 Vue 响应式 (一)(二) 的介绍,我们可以画一个大的代码结构图:

image

我们已经分析了 initState 中的 initData(图右上部分) ,它会将我们的 data 属性转换为 getter / setter。也分析了 mount 的流程,它会编译你的模板到 render 函数,并且创建一个渲染 watcher 来做响应更新。

computed 属性初始化(绿框部分)处于 initState 的流程,晚于 initData ,但早于 mount 的流程,总的来看是从 new Vue 到 dom 的大流程内。

我再次故意强调这个流程的重要性,因为从 Vue 响应式的角度来看,绕来绕去仍然是两个大流程:从 new Vue 到 dom 的初始化, 数据变化时如何响应(只不过computed 的变化是其依赖的变化,而不是 computed 属性本身)。拆分这两个阶段使得我们更好理解 Vue computed 属性的工作原理。

本文以下面的例子来讲解整个流程:

1
2
3
4
5
6
7
8
9
10
11
12
13
14
15
new Vue({
template: '<div>wellcome {{fullName}}</div>',
el: '#app',
data() {
return {
firstName: 'fly',
lastName: 'yang',
};
},
computed: {
fullName() {
return this.firstName + this.lastName;
},
},
});

源码分析

初始化

1
if (opts.computed) initComputed(vm, opts.computed)

initComputed

我们直接看 initComputed, 位于 src/core/instance/state.js:

1
2
3
4
5
6
7
8
9
10
11
12
13
14
15
16
17
18
19
20
21
22
23
24
25
26
27
28
29
30
31
32
33
34
35
36
37
38
39
40
41
const computedWatcherOptions = { lazy: true }
function initComputed (vm: Component, computed: Object) {
// $flow-disable-line
const watchers = vm._computedWatchers = Object.create(null)
// computed properties are just getters during SSR
const isSSR = isServerRendering()

for (const key in computed) {
const userDef = computed[key]
const getter = typeof userDef === 'function' ? userDef : userDef.get
if (process.env.NODE_ENV !== 'production' && getter == null) {
warn(
`Getter is missing for computed property "${key}".`,
vm
)
}

if (!isSSR) {
// create internal watcher for the computed property.
watchers[key] = new Watcher(
vm,
getter || noop,
noop,
computedWatcherOptions
)
}

// component-defined computed properties are already defined on the
// component prototype. We only need to define computed properties defined
// at instantiation here.
if (!(key in vm)) {
defineComputed(vm, key, userDef)
} else if (process.env.NODE_ENV !== 'production') {
if (key in vm.$data) {
warn(`The computed property "${key}" is already defined in data.`, vm)
} else if (vm.$options.props && key in vm.$options.props) {
warn(`The computed property "${key}" is already defined as a prop.`, vm)
}
}
}
}

首先给 vm 定义一个内部属性 _computedWatchers。然后对每一个 computed 属性新建一个 watcher。
由于我们只有一个计算属性,那么生成的结果如下:

image

我们知道在 mount 的流程里,会生成一个渲染 watcher。它和 computed watcher 是不同的,不同点是 computed watcher 是一个 lazy watcher,是不会立即求值的。我们来看代码部分是如何工作的。先简化一下上面的代码:

1
2
3
4
5
6
7
8
9
10
11
12
13
14
const computedWatcherOptions = { lazy: true }
function initComputed (vm: Component, computed: Object) {
for (const key in computed) {
if (!isSSR) {
// create internal watcher for the computed property.
watchers[key] = new Watcher(
vm,
getter || noop,
noop,
computedWatcherOptions
)
}
}
}

我们在新建 watcher 时传入了 { lazy: true }。我们再来看下 watcher 部分的构造函数:

1
2
3
4
5
6
7
8
9
10
11
12
13
14
15
16
17
18
19
20
21
22
23
24
25
26
27
28
29
30
31
32
33
    if (options) {
this.deep = !!options.deep
this.user = !!options.user
this.lazy = !!options.lazy
this.sync = !!options.sync
this.before = options.before
} else {
this.deep = this.user = this.lazy = this.sync = false
}
if (typeof expOrFn === 'function') {
this.getter = expOrFn
} else {
}
this.dirty = this.lazy // for lazy watchers
this.value = this.lazy
? undefined
: this.get()
```

首先将计算属性的函数赋值给 getter, 然后将 dirty 设置为true 。lazy watcher 和 普通的 watcher 的最大的区别在于,并不会直接求值(调用 this.get 方法),而是直接将 value 先设置为 undefined。

对计算属性设置好 lazy watcher 后,回到我们的流程里:

```js
if (!(key in vm)) {
defineComputed(vm, key, userDef)
} else if (process.env.NODE_ENV !== 'production') {
if (key in vm.$data) {
warn(`The computed property "${key}" is already defined in data.`, vm)
} else if (vm.$options.props && key in vm.$options.props) {
warn(`The computed property "${key}" is already defined as a prop.`, vm)
}
}

如果计算属性不在 vm 上调用 defineComputed。如果 vm 已经有,比如计算属性和 data、 prop 重复,开发环境会报一个 warning。

defineComputed

1
2
3
4
5
6
7
8
9
10
11
12
13
14
15
16
17
18
19
20
21
22
23
24
25
26
27
28
29
30
31
32
33
34
35
36
export function defineComputed (
target: any,
key: string,
userDef: Object | Function
) {
const shouldCache = !isServerRendering()
if (typeof userDef === 'function') {
sharedPropertyDefinition.get = shouldCache
? createComputedGetter(key)
: createGetterInvoker(userDef)
sharedPropertyDefinition.set = noop
}
// ...
Object.defineProperty(target, key, sharedPropertyDefinition)
}

function createComputedGetter (key) {
return function computedGetter () {
const watcher = this._computedWatchers && this._computedWatchers[key]
if (watcher) {
if (watcher.dirty) {
watcher.evaluate()
}
if (Dep.target) {
watcher.depend()
}
return watcher.value
}
}
}

function createGetterInvoker(fn) {
return function computedGetter () {
return fn.call(this, this)
}
}

defineComputed 逻辑比较简单,shouldCache 在非服务端渲染的情况下为 true。那么对’fullName’ 来说,它的 getter 就是 createComputedGetter(key) 生成的 函数。函数的 getter 目前是不执行的,后续我们来了解下它的执行过程。

然后通过 Object.defineProperty(target, key, sharedPropertyDefinition) 直接在 vm上定义一个 fullName。虽然和 data 的proxy 流程不太一样,但是我们同样也可以在 vm 上访问计算属性了。

computed 的初始化流程到此就结束了。

mount

由深入浅出 Vue 响应式 (一)可知:首先我们的模板会被编译成 render 函数:

1
2
3
4
ƒ anonymous(
) {
with(this){return _c('div',[_v("wellcome "+_s(fullName))])}
}

image

1
2
3
4
5
6
7
8
9
10
11
12
13
14
15
16
17
18
19
20
21
22
23
24
25
26
27
28
29
30
31
32
33
34
35
var updateComponent;
/* istanbul ignore if */
if (config.performance && mark) {
updateComponent = function () {
var name = vm._name;
var id = vm._uid;
var startTag = "vue-perf-start:" + id;
var endTag = "vue-perf-end:" + id;

mark(startTag);
var vnode = vm._render();
mark(endTag);
measure(("vue " + name + " render"), startTag, endTag);

mark(startTag);
vm._update(vnode, hydrating);
mark(endTag);
measure(("vue " + name + " patch"), startTag, endTag);
};
} else {
updateComponent = function () {
vm._update(vm._render(), hydrating);
};
}

// we set this to vm._watcher inside the watcher's constructor
// since the watcher's initial patch may call $forceUpdate (e.g. inside child
// component's mounted hook), which relies on vm._watcher being already defined
new Watcher(vm, updateComponent, noop, {
before: function before () {
if (vm._isMounted && !vm._isDestroyed) {
callHook(vm, 'beforeUpdate');
}
}
}, true /* isRenderWatcher */);

然后我们会执行一个渲染 watcher。渲染watcher 会立即求值,调用 其getter 方法。也就是会执行 updateComponent 方法。在 vm._render() 过程中,会执行我们编译出的 render 函数。这样就会调用我们的 fullName 的 get 访问器:

1
2
3
4
5
6
7
8
9
10
11
12
function computedGetter () {
const watcher = this._computedWatchers && this._computedWatchers[key]
if (watcher) {
if (watcher.dirty) {
watcher.evaluate()
}
if (Dep.target) {
watcher.depend()
}
return watcher.value
}
}

由上述流程可知,我们定义了一个 lazy watcher , 那么 watcher 有值,并且 watcher.dirty === true。
然后调用watcher.evaluate 方法。evaluate方法本质上就是调用 get 方法进行求值。求值完成后会将 dirty 重置为 false。

1
这里我们也看到了 lazy 的概念,只有在访问到的时候才去求值。
1
2
3
4
5
6
7
8
9
10
11
12
13
14
15
16
17
18
19
20
21
22
23
24
25
26
27
28
get () {
pushTarget(this)
let value
const vm = this.vm
try {
value = this.getter.call(vm, vm)
} catch (e) {
if (this.user) {
handleError(e, vm, `getter for watcher "${this.expression}"`)
} else {
throw e
}
} finally {
// "touch" every property so they are all tracked as
// dependencies for deep watching
if (this.deep) {
traverse(value)
}
popTarget()
this.cleanupDeps()
}
return value
}

evaluate () {
this.value = this.get()
this.dirty = false
}

我们看下 Watcher 的 get 方法,首先会 pushTarget(this)。将当前 lazy watcher 设置为 Dep.target。
然后调用 this.getter.call(vm,vm)。this.getter 就是我们的 函数

1
2
3
fullName() {
return this.firstName + this.lastName;
},

此时会访问 this.firstName 和 this.lastName。走到他们的访问器属性:

1
2
3
4
5
6
7
8
9
10
11
12
13
get: function reactiveGetter () {
const value = getter ? getter.call(obj) : val
if (Dep.target) {
dep.depend()
if (childOb) {
childOb.dep.depend()
if (Array.isArray(value)) {
dependArray(value)
}
}
}
return value
},

这时 firstName 和 lastName 便把计算属性的 lazy watcher 添加到自己的依赖收集 dep 里了。

image

然后执行 popTarget:

1
2
3
4
export function popTarget () {
targetStack.pop()
Dep.target = targetStack[targetStack.length - 1]
}

把 dep.Target 重置为渲染 watcher。

1
2
3
if (Dep.target) {
watcher.depend()
}
1
2
3
4
5
6
depend () {
let i = this.deps.length
while (i--) {
this.deps[i].depend()
}
}
1
2
3
4
5
Dep.prototype.depend = function depend () {
if (Dep.target) {
Dep.target.addDep(this);
}
};

然后调用 watcher.depend 方法。将渲染watcher 添加到 firstName 和 lastName 的依赖收集 dep 内。

image

至此,从new Vue 到 dom过程, 依赖收集便做完了。

响应式

当我们将 firstName 改成 ‘li’ 的时候:

1
2

vm.firstName = 'li'

会走入 firstName 的 setter 内:

1
2
3
4
5
6
7
8
9
10
11
12
13
14
15
16
17
18
19
20
set: function reactiveSetter (newVal) {
var value = getter ? getter.call(obj) : val;
/* eslint-disable no-self-compare */
if (newVal === value || (newVal !== newVal && value !== value)) {
return
}
/* eslint-enable no-self-compare */
if (customSetter) {
customSetter();
}
// #7981: for accessor properties without setter
if (getter && !setter) { return }
if (setter) {
setter.call(obj, newVal);
} else {
val = newVal;
}
childOb = !shallow && observe(newVal);
dep.notify();
}

setter 最终调用 dep.notify 方法。

1
2
3
4
5
6
7
8
9
10
11
12
13
notify () {
// stabilize the subscriber list first
const subs = this.subs.slice()
if (process.env.NODE_ENV !== 'production' && !config.async) {
// subs aren't sorted in scheduler if not running async
// we need to sort them now to make sure they fire in correct
// order
subs.sort((a, b) => a.id - b.id)
}
for (let i = 0, l = subs.length; i < l; i++) {
subs[i].update()
}
}

notify 会按顺序调用所收集依赖的 update 方法。我们来看下 update 方法的代码:

1
2
3
4
5
6
7
8
9
10
update () {
/* istanbul ignore else */
if (this.lazy) {
this.dirty = true
} else if (this.sync) {
this.run()
} else {
queueWatcher(this)
}
}

update 方法,如果遇到 lazy watcher,只会将 dirty 设置为 true。然后就没了。

如上面的流程可知,我们会有两个 watcher, 一个是 lazy watcher ,一个是渲染 watcher。只有渲染 watcher会进入到 watcher 的队列中。

computed 的缓存特性

computed 缓存通常是相对于 method 来说的。computed 只会依赖于其相关 data,而 method 每次都要调用生成。

ISSUE

有问题? 来 GitHub 一起讨论。